Sunday, January 8, 2012

Flipping an Image

Flipping an image means mirroring it on a certain axis. Flipping vertically could be compared to the reflection of yourself in a lake, flipping horizontally is kind of like looking into a mirror. To do a flip, we use drawImage(Image img, int dx1, int dy1, int dx2, int dy2, int sx1, int sy1, int sx2, int sy2, ImageObserver observer); of Graphics2D object. This method lets us draw part of an image into an image, or scale an image etc. The method takes an image, and a set of coordinates of the destination rectangle, it also takes a set of coordinates for the source rectangle of the image you supply. These source coordinates can be manipulated for varying results, as I will show in this next code segment.

For flipping an image horizontally, we give the source rectangle coordinates starting from the top right, and ending at the bottom left like this.
drawImage(Image img, int dx1, int dy1, int dx2, int dy2, int sx1, int sy1, int sx2, int sy2, ImageObserver observer);
g.drawImage(The Source Image, 0, 0, image width, image height, image width, 0, 0, image height, null);
as opposed to the unflipped way
g.drawImage(The Source Image, 0, 0, image width, image height, 0, 0, image width, image height, null);
public static BufferedImage horizontalflip(BufferedImage img) {
int w = img.getWidth();
int h = img.getHeight();
BufferedImage dimg = new BufferedImage(w, h, img.getType());
Graphics2D g = dimg.createGraphics();
g.drawImage(img, 0, 0, w, h, w, 0, 0, h, null);
g.dispose();
return dimg;
}
Running Codes

Making a Certain Color Transparent

A useful function of many imaging programs such as GIMP is its ability to make only one color of an Image transparent; this is called applying a mask. To do this, GIMP evaluates each pixel of an image, and tests if it is the user specified masking color, if it is it sets that pixel's RGB value to nothing, and it's alpha to 0.0. Here is the Java implementation:
public static BufferedImage makeColorTransparent(String ref, Color color) {
BufferedImage image = loadImage(ref);
BufferedImage dimg = new BufferedImage(image.getWidth(), image.getHeight(), BufferedImage.TYPE_INT_ARGB);
Graphics2D g = dimg.createGraphics();
g.setComposite(AlphaComposite.Src);
g.drawImage(image, null, 0, 0);
g.dispose();
for(int i = 0; i < dimg.getHeight(); i++) {
for(int j = 0; j < dimg.getWidth(); j++) {
if(dimg.getRGB(j, i) == color.getRGB()) {
dimg.setRGB(j, i, 0x8F1C1C);
}
}
}
return dimg;
}
This grabs the Graphics2D instance of the destination image, and sets it's composite to Alpha. It then draws the Image onto the screen, and disposes of the Graphics2D to clear up system resources. Next, it cycles through all the pixels in the image, using the for loops, and compares the color of the pixel to the mask color. If the pixels color matches the mask color, that pixels color is replaced by an alpha RGB value. Lastly, the destination image, with mask applied, is returned.
Running Codes

Making an Image Translucent

public static BufferedImage loadTranslucentImage(String url, float transperancy) {
// Load the image
BufferedImage loaded = loadImage(url);
// Create the image using the
BufferedImage aimg = new BufferedImage(loaded.getWidth(), loaded.getHeight(), BufferedImage.TRANSLUCENT);
// Get the images graphics
Graphics2D g = aimg.createGraphics();
// Set the Graphics composite to Alpha
g.setComposite(AlphaComposite.getInstance(AlphaComposite.SRC_OVER, transperancy));
// Draw the LOADED img into the prepared reciver image
g.drawImage(loaded, null, 0, 0);
// let go of all system resources in this Graphics
g.dispose();
// Return the image
return aimg;
}
Running Codes

Saving Image

public static void saveOldWay(String ref, BufferedImage img) {
BufferedOutputStream out;
try {
out = new BufferedOutputStream(new FileOutputStream(ref));
JPEGImageEncoder encoder = JPEGCodec.createJPEGEncoder(out);
JPEGEncodeParam param = encoder.getDefaultJPEGEncodeParam(img);
int quality = 5;
quality = Math.max(0, Math.min(quality, 100));
param.setQuality((float) quality / 100.0f, false);
encoder.setJPEGEncodeParam(param);
encoder.encode(img);
out.close();
} catch (Exception e) {
e.printStackTrace();
}
}
Running Codes

Creating and Using your own Image in Java

public class ImageMaker {
public static BufferedImage createImage() {
BufferedImage img = new BufferedImage(100, 100, BufferedImage.TYPE_INT_RGB);
img.createGraphics();
Graphics2D g = (Graphics2D)img.getGraphics();
g.setColor(Color.YELLOW);
g.fillRect(0, 0, 100, 100);
for(int i = 1; i < 49; i++) {
g.setColor(new Color(5*i, 5*i, 4+1*2+i*3));
g.fillRect(2*i, 2*i, 3*i, 3*1);
}
return img;
}
public static void main(String[] args) {
JFrame frame = new JFrame("Image Maker");
frame.addWindowListener(new WindowAdapter() {
public void windowClosing(WindowEvent event) {
System.exit(0);
}
});
frame.setBounds(0, 0, 200, 200);
JImagePanel panel = new JImagePanel(createImage(), 50, 45);
frame.add(panel);
frame.setVisible(true);
}
}
Running Codes

Drawing an Image on the Screen using Graphics2D

public class ImageApp {
public void loadAndDisplayImage(JFrame frame) {
// Load the img
BufferedImage loadImg = ImageUtil.loadImage("C:/Images/duke.gif");
frame.setBounds(0, 0, loadImg.getWidth(), loadImg.getHeight());
// Set the panel visible and add it to the frame
frame.setVisible(true);
// Get the surfaces Graphics object
Graphics2D g = (Graphics2D)frame.getRootPane().getGraphics();
// Now draw the image
g.drawImage(loadImg, null, 0, 0);
}
public static void main(String[] args) {
ImageApp ia = new ImageApp();
JFrame frame = new JFrame("Tutorials");
ia.loadAndDisplayImage(frame);
}
}
Running Codes

Using Blocking Queues


package com.oreilly.tiger.ch10;


import java.io.PrintStream;

import java.util.Date;

import java.util.concurrent.BlockingQueue;


public class Producer extends Thread {


private BlockingQueue q;

private PrintStream out;


public Producer(BlockingQueue q, PrintStream out) {

setName("Producer");
this.q = q;

this.out = out;

}


public void run( ) {

try {

while (true) {

q.put(produce( ));

}

} catch (InterruptedException e) {

out.printf("%s interrupted: %s", getName( ), e.getMessage( ));

}

}


private String produce( ) {

while (true) {

double r = Math.random( );


// Only goes forward 1/10 of the time

if ((r*100) < 10) {

String s = String.format("Inserted at %tc", new Date( ));

return s;

}

}

}

}

Loading an Image

public static BufferedImage loadImage(String ref) {
BufferedImage bimg = null;
try {
bimg = ImageIO.read(new File(ref));
} catch (Exception e) {
e.printStackTrace();
}
return bimg;
}
Running Codes

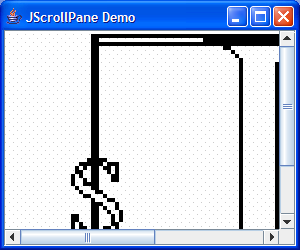
ScrollPane with image

import javax.swing.ImageIcon;
import javax.swing.JFrame;
import javax.swing.JLabel;
import javax.swing.JScrollPane;

public class ScrollPaneDemo extends JFrame {
public ScrollPaneDemo() {
super("JScrollPane Demo");
ImageIcon ii = new ImageIcon("largeJava2sLogo.jpg");
JScrollPane jsp = new JScrollPane(new JLabel(ii));
getContentPane().add(jsp);
setSize(300, 250);
setVisible(true);
}

public static void main(String[] args) {
new ScrollPaneDemo();
}
}
Running Codes

Handling Uncaught Exceptions in Threads

Normally a Java thread (represented by any class that extends java.lang.Thread) stops when its
run( ) method completes. In an abnormal case, such as when something goes wrong, the thread can
terminate by throwing an exception. This exception trickles up the thread's ThreadGroup hierarchy,
and if it gets to the root ThreadGroup, the default behavior is to print out the thread's name,
exception name, exception message, and exception stack trace.
To get around this behavior (at least in Java 1.4 and earlier), you've got to insert your own code into
the ThreadGroup hierarchy, handle the exception, and prevent delegation back to the root
ThreadGroup. While this is certainly possible, you'll have to define your own subclass of
ThreadGroup, make sure any Threads you create are assigned to that group, and generally do a lot
of coding that has very little to do with the task at hand—actually handling the uncaught exception.
Tiger simplifies all this dramatically, and lets you define uncaught exception handling on a per-Thread basis.

Example:


package com.oreilly.tiger.ch10;


public class BubbleSortThread extends Thread {


private int[] numbers;


public BubbleSortThread(int[] numbers) {

setName("Simple Thread");

setUncaughtExceptionHandler(

new SimpleThreadExceptionHandler( ));

this.numbers = numbers;

}


public void run( ) {

int index = numbers.length;

boolean finished = false;

while (!finished) {

index--;

finished = true;

for (int i=0; i<5; i++)="" {="" create="" error="" condition="" if="" (numbers[i+1]="" <="" 0)="" throw="" new="" illegalargumentexception(="" "cannot="" pass="" negative="" numbers="" into="" this="" thread!");="" }="" (numbers[i]=""> numbers[i+1]) {

// swap

int temp = numbers[i];

numbers[i] = numbers[i+1];

numbers[i+1] = temp;


finished = false;

}

}

}

}

}


class SimpleThreadExceptionHandler implements

Thread.UncaughtExceptionHandler {


public void uncaughtException(Thread t, Throwable e) {

System.err.printf("%s: %s at line %d of %s%n",

t.getName( ),

e.toString( ),

e.getStackTrace( )[0].getLineNumber( ),

e.getStackTrace( )[0].getFileName( ));

}

}

How to Write a Tree Selection Listener

To detect when the user selects a node in a tree, you need to register a tree selection listener. Here is an example, taken from the TreeDemo example discussed in Responding to Node Selection, of detecting node selection in a tree that can have at most one node selected at a time:

tree.addTreeSelectionListener(new TreeSelectionListener() {
public void valueChanged(TreeSelectionEvent e) {
DefaultMutableTreeNode node = (DefaultMutableTreeNode)
tree.getLastSelectedPathComponent();

/* if nothing is selected */
if (node == null) return;

/* retrieve the node that was selected */
Object nodeInfo = node.getUserObject();
...
/* React to the node selection. */
...
}
});

To specify that the tree should support single selection, the program uses this code:

tree.getSelectionModel().setSelectionMode
(TreeSelectionModel.SINGLE_TREE_SELECTION);

The TreeSelectionModel interface defines three values for the selection mode:

DISCONTIGUOUS_TREE_SELECTION
This is the default mode for the default tree selection model. With this mode, any combination of nodes can be selected.
SINGLE_TREE_SELECTION
This is the mode used by the preceding example. At most one node can be selected at a time.
CONTIGUOUS_TREE_SELECTION
With this mode, only nodes in adjoining rows can be selected.
Running Codes

Creating a Data Model

If DefaultTreeModel does not suit your needs, then you will need to write a custom data model. Your data model must implement the TreeModel interface. TreeModel specifies methods for getting a particular node of the tree, getting the number of children of a particular node, determining whether a node is a leaf, notifying the model of a change in the tree, and adding and removing tree model listeners.

Interestingly, the TreeModel interface accepts any kind of object as a tree node. It does not require that nodes be represented by DefaultMutableTreeNode objects, or even that nodes implement the TreeNode interface. Thus, if the TreeNode interface is not suitable for your tree model, feel free to devise your own representation for tree nodes. For example, if you have a pre-existing hierarchical data structure, you do not need to duplicate it or force it into the TreeNode mold. You just need to implement your tree model so that it uses the information in the existing data structure.
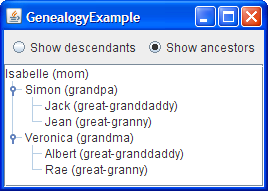
The following figure shows an application called GenealogyExample that displays the descendants or ancestors of a particular person.
Running Codes

How to Load Children Lazily

Lazy loading is a characteristic of an application when the actual loading and instantiation of a class is delayed until the point just before the instance is actually used.

Do we gain anything by loading them lazily? Yes, this would definitely add to the performance of an application. By lazily loading, you can dedicate the memory resources to load and instantiate an object only when it is actually used. You can also speed up the initial loading time of an application.

One of the ways you can lazily load children of a Tree is by utilizing the TreeWillExpandListener interface. For example, you can declare and load root, grandparent and parent of a Tree along with the application as shown in the following code:

Let us declare the root, grandparent and parent as shown below:

class DemoArea extends JScrollPane
implements TreeWillExpandListener {
.......
.......

private TreeNode createNodes() {
DefaultMutableTreeNode root;
DefaultMutableTreeNode grandparent;
DefaultMutableTreeNode parent;

root = new DefaultMutableTreeNode("San Francisco");

grandparent = new DefaultMutableTreeNode("Potrero Hill");
root.add(grandparent);

parent = new DefaultMutableTreeNode("Restaurants");
grandparent.add(parent);
dummyParent = parent;
return root;
}


You can load above declared nodes to the tree as shown in the following code:

TreeNode rootNode = createNodes();
tree = new JTree(rootNode);
tree.addTreeExpansionListener(this);
tree.addTreeWillExpandListener(this);
.......
.......
setViewportView(tree);

Now, you can load children lazily to the application whenever the parent node Restaurants is visible in the application. To do this, let us declare two children in a separate method and call that method as shown in the following code:

private void LoadLazyChildren(){
DefaultMutableTreeNode child;
child = new DefaultMutableTreeNode("Thai Barbeque");
dummyParent.add(child);
child = new DefaultMutableTreeNode("Goat Hill Pizza");
dummyParent.add(child);
textArea.append(" Thai Barbeque and Goat Hill Pizza are loaded lazily");
}

.......
.......

public void treeWillExpand(TreeExpansionEvent e)
throws ExpandVetoException {
saySomething("You are about to expand node ", e);
int n = JOptionPane.showOptionDialog(
this, willExpandText, willExpandTitle,
JOptionPane.YES_NO_OPTION,
JOptionPane.QUESTION_MESSAGE,
null,
willExpandOptions,
willExpandOptions[1]);
LoadLazyChildren();
}

Running Codes

Dynamically Changing a Tree

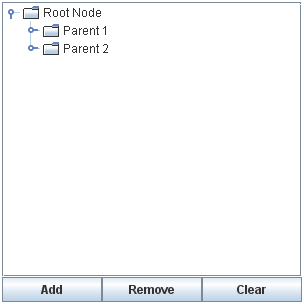
The following figure shows an application called DynamicTreeDemo that lets you add nodes to and remove nodes from a visible tree. You can also edit the text in each node.
Here is the code that initializes the tree:

rootNode = new DefaultMutableTreeNode("Root Node");
treeModel = new DefaultTreeModel(rootNode);
treeModel.addTreeModelListener(new MyTreeModelListener());

tree = new JTree(treeModel);
tree.setEditable(true);
tree.getSelectionModel().setSelectionMode
(TreeSelectionModel.SINGLE_TREE_SELECTION);
tree.setShowsRootHandles(true);

By explicitly creating the tree's model, the code guarantees that the tree's model is an instance of DefaultTreeModel. That way, we know all the methods that the tree model supports. For example, we know that we can invoke the model's insertNodeInto method, even though that method is not required by the TreeModel interface.

To make the text in the tree's nodes editable, we invoke setEditable(true) on the tree. When the user has finished editing a node, the model generates a tree model event that tells any listeners — including the JTree — that tree nodes have changed. Note that although DefaultMutableTreeNode has methods for changing a node's content, changes should go through the DefaultTreeModel cover methods. Otherwise, the tree model events would not be generated, and listeners such as the tree would not know about the updates.

To be notified of node changes, we can implement a TreeModelListener. Here is an example of a tree model listener that detects when the user has typed in a new name for a tree node:

class MyTreeModelListener implements TreeModelListener {
public void treeNodesChanged(TreeModelEvent e) {
DefaultMutableTreeNode node;
node = (DefaultMutableTreeNode)
(e.getTreePath().getLastPathComponent());

/*
* If the event lists children, then the changed
* node is the child of the node we have already
* gotten. Otherwise, the changed node and the
* specified node are the same.
*/
try {
int index = e.getChildIndices()[0];
node = (DefaultMutableTreeNode)
(node.getChildAt(index));
} catch (NullPointerException exc) {}

System.out.println("The user has finished editing the node.");
System.out.println("New value: " + node.getUserObject());
}
public void treeNodesInserted(TreeModelEvent e) {
}
public void treeNodesRemoved(TreeModelEvent e) {
}
public void treeStructureChanged(TreeModelEvent e) {
}
}

Here is the code that the Add button's event handler uses to add a new node to the tree:

treePanel.addObject("New Node " + newNodeSuffix++);
...
public DefaultMutableTreeNode addObject(Object child) {
DefaultMutableTreeNode parentNode = null;
TreePath parentPath = tree.getSelectionPath();

if (parentPath == null) {
//There is no selection. Default to the root node.
parentNode = rootNode;
} else {
parentNode = (DefaultMutableTreeNode)
(parentPath.getLastPathComponent());
}

return addObject(parentNode, child, true);
}
...
public DefaultMutableTreeNode addObject(DefaultMutableTreeNode parent,
Object child,
boolean shouldBeVisible) {
DefaultMutableTreeNode childNode =
new DefaultMutableTreeNode(child);
...
treeModel.insertNodeInto(childNode, parent,
parent.getChildCount());

//Make sure the user can see the lovely new node.
if (shouldBeVisible) {
tree.scrollPathToVisible(new TreePath(childNode.getPath()));
}
return childNode;
}

The code creates a node, inserts it into the tree model, and then, if appropriate, requests that the nodes above it be expanded and the tree scrolled so that the new node is visible. To insert the node into the model, the code uses the insertNodeInto method provided by the DefaultTreeModel class.
Running Codes

Customizing a Tree's Display

A tree typically also performs some look-and-feel-specific painting to indicate relationships between nodes. You can customize this painting in a limited way. First, you can use tree.setRootVisible(true) to show the root node or tree.setRootVisible(false) to hide it. Second, you can use tree.setShowsRootHandles(true) to request that a tree's top-level nodes — the root node (if it is visible) or its children (if not) — have handles that let them be expanded or collapsed.

If you are using the Java look and feel, you can customize whether lines are drawn to show relationships between tree nodes. By default, the Java look and feel draws angled lines between nodes. By setting the JTree.lineStyle client property of a tree, you can specify a different convention. For example, to request that the Java look and feel use only horizontal lines to group nodes, use the following code:

tree.putClientProperty("JTree.lineStyle", "Horizontal");

To specify that the Java look and feel should draw no lines, use this code:

tree.putClientProperty("JTree.lineStyle", "None");

The following snapshots show the results of setting the JTree.lineStyle property, when using the Java look and feel.
No matter what the look and feel, the default icon displayed by a node is determined by whether the node is a leaf and, if not, whether it is expanded. For example, in the Windows and Motif look and feel implementations, the default icon for each leaf node is a dot; in the Java look and feel, the default leaf icon is a paper-like symbol. In all the look-and-feel implementations we have shown, branch nodes are marked with folder-like symbols. Some look and feels might have different icons for expanded branches versus collapsed branches.

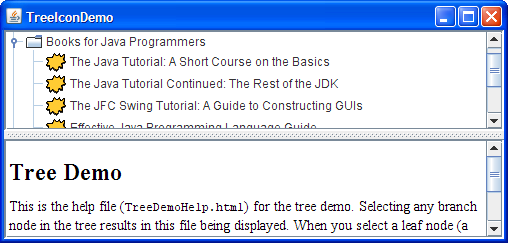
You can easily change the default icon used for leaf, expanded branch, or collapsed branch nodes. To do so, you first create an instance of DefaultTreeCellRenderer. You could always create your own TreeCellRenderer implementation from scratch, reusing whatever components you like. Next, specify the icons to use by invoking one or more of the following methods on the renderer: setLeafIcon (for leaf nodes), setOpenIcon (for expanded branch nodes), setClosedIcon (for collapsed branch nodes). If you want the tree to display no icon for a type of node, then specify null for the icon. Once you have set up the icons, use the tree's setCellRenderer method to specify that the DefaultTreeCellRenderer paint its nodes. Here is an example, taken from TreeIconDemo.java:

ImageIcon leafIcon = createImageIcon("images/middle.gif");
if (leafIcon != null) {
DefaultTreeCellRenderer renderer =
new DefaultTreeCellRenderer();
renderer.setLeafIcon(leafIcon);
tree.setCellRenderer(renderer);
}

Running Codes

How to respond to a tree node selection

The following code creates the JTree object and puts it in a scroll pane:

//Where instance variables are declared:
private JTree tree;
...
public TreeDemo() {
...
DefaultMutableTreeNode top =
new DefaultMutableTreeNode("The Java Series");
createNodes(top);
tree = new JTree(top);
...
JScrollPane treeView = new JScrollPane(tree);
...
}

The code creates an instance of DefaultMutableTreeNode to serve as the root node for the tree. It then creates the rest of the nodes in the tree. After that, it creates the tree, specifying the root node as an argument to the JTree constructor. Finally, it puts the tree in a scroll pane, a common tactic because showing the full, expanded tree would otherwise require too much space.

Here is the code that creates the nodes under the root node:

private void createNodes(DefaultMutableTreeNode top) {
DefaultMutableTreeNode category = null;
DefaultMutableTreeNode book = null;
category = new DefaultMutableTreeNode("Books for Java Programmers");
top.add(category);
//original Tutorial
book = new DefaultMutableTreeNode(new BookInfo
("The Java Tutorial: A Short Course on the Basics",
"tutorial.html"));
category.add(book);
//Tutorial Continued
book = new DefaultMutableTreeNode(new BookInfo
("The Java Tutorial Continued: The Rest of the JDK",
"tutorialcont.html"));
category.add(book);
//Swing Tutorial
book = new DefaultMutableTreeNode(new BookInfo
("The Swing Tutorial: A Guide to Constructing GUIs",
"swingtutorial.html"));
category.add(book);

//...add more books for programmers...

category = new DefaultMutableTreeNode("Books for Java Implementers");
top.add(category);

//VM
book = new DefaultMutableTreeNode(new BookInfo
("The Java Virtual Machine Specification",
"vm.html"));
category.add(book);

//Language Spec
book = new DefaultMutableTreeNode(new BookInfo
("The Java Language Specification",
"jls.html"));
category.add(book);
}

The argument to the DefaultMutableTreeNode constructor is the user object which is an object that contains or points to the data associated with the tree node. The user object can be a string, or it can be a custom object. If you implement a custom object, you should implement its toString method so that it returns the string to be displayed for that node. JTree, by default, renders each node using the value returned from toString, so it is important that toString returns something meaningful. Sometimes, it is not feasible to override toString; in such a scenario you can override the convertValueToText of JTree to map the object from the model into a string that gets displayed.

For example, the BookInfo class used in the previous code snippet is a custom class that holds two pieces of data: the name of a book, and the URL for an HTML file describing the book. The toString method is implemented to return the book name. Thus, each node associated with a BookInfo object displays a book name.
Running Codes

How to Create Trees

The following code creates the JTree object and puts it in a scroll pane:

//Where instance variables are declared:
private JTree tree;
...
public TreeDemo() {
...
DefaultMutableTreeNode top =
new DefaultMutableTreeNode("The Java Series");
createNodes(top);
tree = new JTree(top);
...
JScrollPane treeView = new JScrollPane(tree);
...
}

The code creates an instance of DefaultMutableTreeNode to serve as the root node for the tree. It then creates the rest of the nodes in the tree. After that, it creates the tree, specifying the root node as an argument to the JTree constructor. Finally, it puts the tree in a scroll pane, a common tactic because showing the full, expanded tree would otherwise require too much space.

Here is the code that creates the nodes under the root node:

private void createNodes(DefaultMutableTreeNode top) {
DefaultMutableTreeNode category = null;
DefaultMutableTreeNode book = null;
category = new DefaultMutableTreeNode("Books for Java Programmers");
top.add(category);
//original Tutorial
book = new DefaultMutableTreeNode(new BookInfo
("The Java Tutorial: A Short Course on the Basics",
"tutorial.html"));
category.add(book);
//Tutorial Continued
book = new DefaultMutableTreeNode(new BookInfo
("The Java Tutorial Continued: The Rest of the JDK",
"tutorialcont.html"));
category.add(book);
//Swing Tutorial
book = new DefaultMutableTreeNode(new BookInfo
("The Swing Tutorial: A Guide to Constructing GUIs",
"swingtutorial.html"));
category.add(book);

//...add more books for programmers...

category = new DefaultMutableTreeNode("Books for Java Implementers");
top.add(category);

//VM
book = new DefaultMutableTreeNode(new BookInfo
("The Java Virtual Machine Specification",
"vm.html"));
category.add(book);

//Language Spec
book = new DefaultMutableTreeNode(new BookInfo
("The Java Language Specification",
"jls.html"));
category.add(book);
}

The argument to the DefaultMutableTreeNode constructor is the user object which is an object that contains or points to the data associated with the tree node. The user object can be a string, or it can be a custom object. If you implement a custom object, you should implement its toString method so that it returns the string to be displayed for that node. JTree, by default, renders each node using the value returned from toString, so it is important that toString returns something meaningful. Sometimes, it is not feasible to override toString; in such a scenario you can override the convertValueToText of JTree to map the object from the model into a string that gets displayed.

For example, the BookInfo class used in the previous code snippet is a custom class that holds two pieces of data: the name of a book, and the URL for an HTML file describing the book. The toString method is implemented to return the book name. Thus, each node associated with a BookInfo object displays a book name.
Running Codes

How to take single snapshots from a webcam

Buffer buf = frameGrabber.grabFrame();
// Convert frame to an buffered image so it can be processed and saved
Image img = (new BufferToImage((VideoFormat) buf.getFormat()).createImage(buf));
buffImg = new BufferedImage(img.getWidth(this), img.getHeight(this), BufferedImage.TYPE_INT_RGB);
//TODO saving the buffImg

Running Codes

Enabling Multiple Selections in a JFileChooser Dialog

JFileChooser chooser = new JFileChooser();

// Enable multiple selections
chooser.setMultiSelectionEnabled(true);

// Show the dialog; wait until dialog is closed
chooser.showOpenDialog(frame);

// Retrieve the selected files. This method returns empty
// if multiple-selection mode is not enabled.
File[] files = chooser.getSelectedFiles();
Running Codes

How to Make Dialogs

A Dialog window is an independent subwindow meant to carry temporary notice apart from the main Swing Application Window. Most Dialogs present an error message or warning to a user, but Dialogs can present images, directory trees, or just about anything compatible with the main Swing Application that manages them.

For convenience, several Swing component classes can directly instantiate and display dialogs. To create simple, standard dialogs, you use the JOptionPane class. The ProgressMonitor class can put up a dialog that shows the progress of an operation. Two other classes, JColorChooser and JFileChooser, also supply standard dialogs. To bring up a print dialog, you can use the Printing API. To create a custom dialog, use the JDialog class directly.

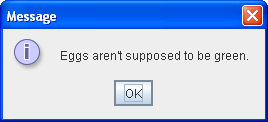
The code for simple dialogs can be minimal. For example, here is an informational dialog:
Here is the code that creates and shows it:

JOptionPane.showMessageDialog(frame, "Eggs are not supposed to be green.");

Running Codes

How to Use Tool Tips

Creating a tool tip for any JComponent object is easy. Use the setToolTipText method to set up a tool tip for the component. For example, to add tool tips to three buttons, you add only three lines of code:

b1.setToolTipText("Click this button to disable the middle button.");
b2.setToolTipText("This middle button does not react when you click it.");
b3.setToolTipText("Click this button to enable the middle button.");

When the user of the program pauses with the cursor over any of the program's buttons, the tool tip for the button comes up.
Running Codes

How to Use File Choosers

Bringing up a standard open dialog requires only two lines of code:

//Create a file chooser
final JFileChooser fc = new JFileChooser();
...
//In response to a button click:
int returnVal = fc.showOpenDialog(aComponent);

The argument to the showOpenDialog method specifies the parent component for the dialog. The parent component affects the position of the dialog and the frame that the dialog depends on. For example, the Java look and feel places the dialog directly over the parent component. If the parent component is in a frame, then the dialog is dependent on that frame. This dialog disappears when the frame is minimized and reappears when the frame is maximized.

By default, a file chooser that has not been shown before displays all files in the user's home directory. You can specify the file chooser's initial directory by using one of JFileChooser's other constructors, or you can set the directory with the setCurrentDirectory method.

The call to showOpenDialog appears in the actionPerformed method of the Open a File button's action listener:

public void actionPerformed(ActionEvent e) {
//Handle open button action.
if (e.getSource() == openButton) {
int returnVal = fc.showOpenDialog(FileChooserDemo.this);

if (returnVal == JFileChooser.APPROVE_OPTION) {
File file = fc.getSelectedFile();
//This is where a real application would open the file.
log.append("Opening: " + file.getName() + "." + newline);
} else {
log.append("Open command cancelled by user." + newline);
}
} ...
}

The showXxxDialog methods return an integer that indicates whether the user selected a file. Depending on how you use a file chooser, it is often sufficient to check whether the return value is APPROVE_OPTION and then not to change any other value. To get the chosen file (or directory, if you set up the file chooser to allow directory selections), call the getSelectedFile method on the file chooser. This method returns an instance of File.

The example obtains the name of the file and uses it in the log message. You can call other methods on the File object, such as getPath, isDirectory, or exists to obtain information about the file. You can also call other methods such as delete and rename to change the file in some way. Of course, you might also want to open or save the file by using one of the reader or writer classes provided by the Java platform. See Basic I/O for information about using readers and writers to read and write data to the file system.

The example program uses the same instance of the JFileChooser class to display a standard save dialog. This time the program calls showSaveDialog:

int returnVal = fc.showSaveDialog(FileChooserDemo.this);

By using the same file chooser instance to display its open and save dialogs, the program reaps the following benefits:

The chooser remembers the current directory between uses, so the open and save versions automatically share the same current directory.
You have to customize only one file chooser, and the customizations apply to both the open and save versions.

Finally, the example program has commented-out lines of code that let you change the file selection mode. For example, the following line of code makes the file chooser able to select only directories, and not files:

fc.setFileSelectionMode(JFileChooser.DIRECTORIES_ONLY);

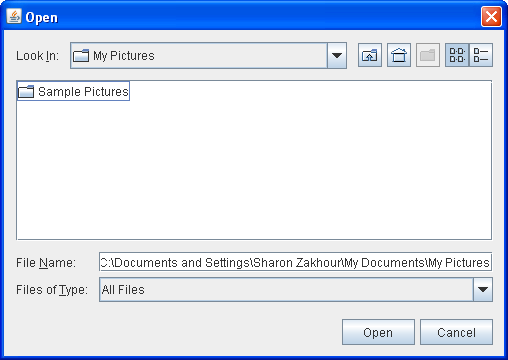
Another possible selection mode is FILES_AND_DIRECTORIES. The default is FILES_ONLY. The following picture shows an open dialog with the file selection mode set to DIRECTORIES_ONLY. Note that, in the Java look and feel at least, only directories are visible — not files.
Running Codes

STL(standard template library)


The Standard Template Libraries (STL's) are a set of C++ template classes to provide common programming data structures
and functions such as doubly linked lists (list), paired arrays (map), expandable arrays (vector), large string storage
and manipulation (rope), etc. The STL library is available from the STL home page. This is also your best detailed
reference for all of the STL class functions available.

STL can be categorized into the following groupings:

Container classes:
Sequences:
vector: (this tutorial) Dynamic array of variables, struct or objects. Insert data at the end.
(also see the YoLinux.com tutorial on using and STL list and boost ptr_list to manage pointers.)
deque: Array which supports insertion/removal of elements at beginning or end of array
list: (this tutorial) Linked list of variables, struct or objects. Insert/remove anywhere.
Associative Containers:
set (duplicate data not allowed in set), multiset (duplication allowed): Collection of ordered data in a balanced binary tree structure. Fast search.
map (unique keys), multimap (duplicate keys allowed): Associative key-value pair held in balanced binary tree structure.
Container adapters:
stack LIFO
queue FIFO
priority_queue returns element with highest priority.
String:
string: Character strings and manipulation
rope: String storage and manipulation
bitset: Contains a more intuitive method of storing and manipulating bits.
Operations/Utilities:
iterator: (examples in this tutorial) STL class to represent position in an STL container. An iterator is declared to be associated with a single container class type.
algorithm: Routines to find, count, sort, search, ... elements in container classes
auto_ptr: Class to manage memory pointers and avoid memory leaks.
Running Codes
http://en.wikipedia.org/wiki/Standard_Template_Library

Cone in Java 3d Programming

Cone defines a simple ConePrimitive with a radius and a height, illustrated in figures 8.3 and 8.4. It is a
capped cone centered at the origin with its central axis aligned along the Y−axis. The center of the Cone is
defined to be the center of its bounding box (rather than its centroid). If the GENERATE_TEXTURE_COORDS
flag is set, the texture coordinates are generated so that the texture gets mapped onto the Cone similarly to a
Cylinder, except without a top cap.
Cone consists of the following Shape3D objects:
ALIGN="JUSTIFY">int BODY = 0; •
"JUSTIFY">int CAP = 1;
The geometry for the Cone consists of a Cylinder tapering from the supplied radius at one end to zero
radius at the other end. A disk is created using the same number of divisions as the Cylinder and aligned to
close the open end of the Cylinder.
Running Codes
java.lang.Object
|
+−−javax.media.j3d.SceneGraphObject
|
+−−javax.media.j3d.Node
|
+−−javax.media.j3d.Group
|
+−−com.sun.j3d.utils.geometry.Primitive
public Cone(float radius, float height, int primflags,
int xdivision, int ydivision, Appearance ap) |
+−−com.sun.j3d.utils.geometry.Cone

http://download.java.net/media/java3d/javadoc/1.3.2/com/sun/j3d/utils/geometry/Cone.html

Box in Java 3d Programming

Cone defines a simple ConePrimitive with a radius and a height, illustrated in figures 8.3 and 8.4. It is a
capped cone centered at the origin with its central axis aligned along the Y−axis. The center of the Cone is
defined to be the center of its bounding box (rather than its centroid). If the GENERATE_TEXTURE_COORDS
flag is set, the texture coordinates are generated so that the texture gets mapped onto the Cone similarly to a
Cylinder, except without a top cap.
Cone consists of the following Shape3D objects:
ALIGN="JUSTIFY">int BODY = 0; •
"JUSTIFY">int CAP = 1;
The geometry for the Cone consists of a Cylinder tapering from the supplied radius at one end to zero
radius at the other end. A disk is created using the same number of divisions as the Cylinder and aligned to
close the open end of the Cylinder.
Running Codes
java.lang.Object
|
+−−javax.media.j3d.SceneGraphObject
|
+−−javax.media.j3d.Node
|
+−−javax.media.j3d.Group
|
+−−com.sun.j3d.utils.geometry.Primitive
public Cone(float radius, float height, int primflags,
int xdivision, int ydivision, Appearance ap) |
+−−com.sun.j3d.utils.geometry.Cone

http://download.java.net/media/java3d/javadoc/1.3.2/com/sun/j3d/utils/geometry/Cone.html

Saturday, January 7, 2012

Thread Synchronizing in Java Threading

Thread Synchronization

Threads communicate primarily by sharing access to fields and the objects reference fields refer to. This form of communication is extremely efficient, but makes two kinds of errors possible: thread interference and memory consistency errors. The tool needed to prevent these errors is synchronization.

The Producer/Consumer example

To introduce systematically the Java threads synchronization techniques consider the Producer/Consumer example, proposed in http://www.cs.technion.ac.il/~assaf/publications/parjava.doc.gz. We modified this example to facilitate the practical experimentation of the analyzed synchronization ideas.

The example consists of a class MyData0 that stores an integer value and of two threads of the classes Producer and Consumer. The Producer writes in an infinite loop consecutive integer values into the MyData0 object and the Consumer reads in an infinite loop these values. The Producer and Consumer threads are created and initialized in the ProducerConsumerDriver class.

The task is to synchronize the Producer and the Consumer so that the values will not be lost when the Producer performs two consecutive writings, and the values will not be duplicated when the Consumer will performs to consecutive readings.

Consider first the first Version of this example without any synchronization:

public class Producer extends Thread {
private CubbyHole cubbyhole;
private int number;

public Producer(CubbyHole c, int number) {
cubbyhole = c;
this.number = number;
}

public void run() {
for (int i = 0; i < 10; i++) { cubbyhole.put(i); System.out.println("Producer #" + this.number + " put: " + i); try { sleep((int)(Math.random() * 100)); } catch (InterruptedException e) { } } } } public class Consumer extends Thread { private CubbyHole cubbyhole; private int number; public Consumer(CubbyHole c, int number) { cubbyhole = c; this.number = number; } public void run() { int value = 0; for (int i = 0; i < 10; i++) { value = cubbyhole.get(); System.out.println("Consumer #" + this.number + " got: " + value); } } }


Main Program

public class ProducerConsumerTest {
public static void main(String[] args) {
CubbyHole c = new CubbyHole();
Producer p1 = new Producer(c, 1);
Consumer c1 = new Consumer(c, 1);

p1.start();
c1.start();
}
}

Thread DeadLock in Java

What is a deadlock?
We say that a set of processes or threads is deadlocked when each thread is waiting for an event that only another process in the set can cause. Another way to illustrate a deadlock is to build a directed graph whose vertices are threads or processes and whose edges represent the "is-waiting-for" relation. If this graph contains a cycle, the system is deadlocked. Unless the system is designed to recover from deadlocks, a deadlock causes the program or system to hang.

Deadlock describes a situation where two or more threads are blocked forever, waiting for each other. Here's an example.

public class Deadlock {
static class Friend {
private final String name;
public Friend(String name) {
this.name = name;
}
public String getName() {
return this.name;
}
public synchronized void bow(Friend bower) {
System.out.format("%s: %s"
+ " has bowed to me!%n",
this.name, bower.getName());
bower.bowBack(this);
}
public synchronized void bowBack(Friend bower) {
System.out.format("%s: %s"
+ " has bowed back to me!%n",
this.name, bower.getName());
}
}

public static void main(String[] args) {
final Friend alphonse =
new Friend("Alphonse");
final Friend gaston =
new Friend("Gaston");
new Thread(new Runnable() {
public void run() { alphonse.bow(gaston); }
}).start();
new Thread(new Runnable() {
public void run() { gaston.bow(alphonse); }
}).start();
}
}

JavaEE What is,Why we need it

General APIs

The Java EE APIs includes several technologies that extend the functionality of the base Java SE APIs.
Java EE 6 Platform Packages
Java EE 5 Platform Packages
javax.faces.*
This package defines the root of the JavaServer Faces (JSF) API. JSF is a technology for constructing user interfaces out of components
javax.faces.component.*
This package defines the component part of the JavaServer Faces (JSF) API. Since JSF is primarily component oriented, this is one of the core packages. The package overview contains a UML diagram of the component hierarchy.
javax.servlet.*
The servlet specification defines a set of APIs to service mainly HTTP requests. It includes the JavaServer Pages specification.
javax.enterprise.inject.*
These packages define the injection annotations for the contexts and Dependency Injection (CDI) API.
javax.enterprise.context.*
These packages define the context annotations and interfaces for the Contexts and Dependency Injection (CDI) API.
javax.ejb.*
The Enterprise JavaBean (EJB) specification defines a set of lightweight APIs that an object container (the EJB container) will support in order to provide transactions (using JTA), remote procedure calls (using RMI or RMI-IIOP), concurrency control, dependency injection and access control for business objects. This package contains the Enterprise JavaBeans classes and interfaces that define the contracts between the enterprise bean and its clients and between the enterprise bean and the ejb container.
javax.validation
This package contains the annotations and interfaces for the declarative validation support offered by the Bean Validation API. Bean Validation provides a unified way to provide constraints on beans (e.g. JPA model classes) that can be enforced cross-layer. In Java EE, JPA honors bean validation constraints in the persistence layer, while JSF does so in the view layer.
javax.persistence
This package contains the classes and interfaces that define the contracts between a persistence provider and the managed classes and the clients of the Java Persistence API (JPA).
javax.transaction
This package provides the Java Transaction API (JTA) API that contains the interfaces to interact with the transaction support offered by Java EE. Even though this API abstracts from the really low-level details, it is itself also considered somewhat low-level and the average application developer in Java EE is assumed to be relying on transparent handling of transactions by the higher level EJB abstractions.
javax.jms.*
This package defines the Java Message Service (JMS) API. The JMS API provides a common way for Java programs to create, send, receive and read an enterprise messaging system's messages.
javax.resource.*
This package defines the Java EE Connector Architecture (JCA) API. Java EE Connector Architecture (JCA) is a Java-based technology solution for connecting application servers and enterprise information systems (EIS) as part of enterprise application integration (EAI) solutions. This is a low-level API aimed at vendors that the average application developer typically does not come in contact with.

Multithreading in Java

Introduction

So far you have learned about a single thread. Lets us know about the concept of multithreading and learn the implementation of it. But before that, lets be aware from the multitasking.

Multitasking :

Multitasking allow to execute more than one tasks at the same time, a task being a program. In multitasking only one CPU is involved but it can switches from one program to another program so quickly that's why it gives the appearance of executing all of the programs at the same time. Multitasking allow processes (i.e. programs) to run concurrently on the program. For Example running the spreadsheet program and you are working with word processor also.
Multitasking is running heavyweight processes by a single OS.

Multithreading :

Multithreading is a technique that allows a program or a process to execute many tasks concurrently (at the same time and parallel). It allows a process to run its tasks in parallel mode on a single processor system

In the multithreading concept, several multiple lightweight processes are run in a single process/task or program by a single processor. For Example, When you use a word processor you perform a many different tasks such as printing, spell checking and so on. Multithreaded software treats each process as a separate program.

In Java, the Java Virtual Machine (JVM) allows an application to have multiple threads of execution running concurrently. It allows a program to be more responsible to the user. When a program contains multiple threads then the CPU can switch between the two threads to execute them at the same time.
For example, look at the diagram shown as:


In this diagram, two threads are being executed having more than one task. The task of each thread is switched to the task of another thread.

Advantages of multithreading over multitasking :

Reduces the computation time.
Improves performance of an application.
Threads share the same address space so it saves the memory.
Context switching between threads is usually less expensive than between processes.
Cost of communication between threads is relatively low.
Different states implementing Multiple-Threads are:


As we have seen different states that may be occur with the single thread. A running thread can enter to any non-runnable state, depending on the circumstances. A thread cannot enters directly to the running state from non-runnable state, firstly it goes to runnable state. Now lets understand the some non-runnable states which may be occur handling the multithreads.
Sleeping ? On this state, the thread is still alive but it is not runnable, it might be return to runnable state later, if a particular event occurs. On this state a thread sleeps for a specified amount of time. You can use the method sleep( ) to stop the running state of a thread.

static void sleep(long millisecond) throws InterruptedException
Waiting for Notification ? A thread waits for notification from another thread. The thread sends back to runnable state after sending notification from another thread.

final void wait(long timeout) throws InterruptedException
final void wait(long timeout, int nanos) throws InterruptedException
final void wait() throws InterruptedException

Blocked on I/O ? The thread waits for completion of blocking operation. A thread can enter on this state because of waiting I/O resource. In that case the thread sends back to runnable state after availability of resources.

Blocked for joint completion ? The thread can come on this state because of waiting the completion of another thread.

Blocked for lock acquisition ? The thread can come on this state because of waiting to acquire the lock of an object.

Threading & Process, Simple Example of Threading

Process
A process is an instance of a computer program that is executed sequentially. It is a collection of instructions which are executed simultaneously at the rum time. Thus several processes may be associated with the same program. For example, to check the spelling is a single process in the Word Processor program and you can also use other processes like printing, formatting, drawing, etc. associated with this program.

Thread

A thread is a lightweight process which exist within a program and executed to perform a special task. Several threads of execution may be associated with a single process. Thus a process that has only one thread is referred to as a single-threaded process, while a process with multiple threads is referred to as a multi-threaded process.

In Java Programming language, thread is a sequential path of code execution within a program. Each thread has its own local variables, program counter and lifetime. In single threaded runtime environment, operations are executes sequentially i.e. next operation can execute only when the previous one is complete. It exists in a common memory space and can share both data and code of a program. Threading concept is very important in Java through which we can increase the speed of any application. You can see diagram shown below in which a thread is executed along with its several operations with in a single process.

Threading Example

public class SimpleThread extends Thread {
private int countDown = 5;
private static int threadCount = 0;
public SimpleThread() {
super("" + ++threadCount); // Store the thread name
start();
}
public String toString() {
return "#" + getName() + ": " + countDown;
}
public void run() {
while(true) {
System.out.println(this);
if(--countDown == 0) return;
}
}
public static void main(String[] args) {
for(int i = 0; i < 5; i++) new SimpleThread(); } } ///

Netbeans warns you about sleep() and not about join() in Java Threading

if i put a thread to sleep in a loop, netbeans gives me a caution saying Invoking Thread.sleep in loop can cause performance problems. However, if i were to replace the sleep with join, no such caution is given. Both versions compile and work fine tho. My code is below (check the last few lines for "Thread.sleep() vs t.join()").


public class Test{

//Display a message, preceded by the name of the current thread
static void threadMessage(String message) {
String threadName = Thread.currentThread().getName();
System.out.format("%s: %s%n", threadName, message);
}

private static class MessageLoop implements Runnable {
public void run() {
String importantInfo[] = {
"Mares eat oats",
"Does eat oats",
"Little lambs eat ivy",
"A kid will eat ivy too"
};
try {
for (int i = 0; i < importantInfo.length; i++) { //Pause for 4 seconds Thread.sleep(4000); //Print a message threadMessage(importantInfo[i]); } } catch (InterruptedException e) { threadMessage("I wasn't done!"); } } } public static void main(String args[]) throws InterruptedException { //Delay, in milliseconds before we interrupt MessageLoop //thread (default one hour). long patience = 1000 * 60 * 60; //If command line argument present, gives patience in seconds. if (args.length > 0) {
try {
patience = Long.parseLong(args[0]) * 1000;
} catch (NumberFormatException e) {
System.err.println("Argument must be an integer.");
System.exit(1);
}

}

threadMessage("Starting MessageLoop thread");
long startTime = System.currentTimeMillis();
Thread t = new Thread(new MessageLoop());
t.start();

threadMessage("Waiting for MessageLoop thread to finish");
//loop until MessageLoop thread exits
while (t.isAlive()) {
threadMessage("Still waiting...");
//Wait maximum of 1 second for MessageLoop thread to
//finish.
/*******LOOK HERE**********************/
Thread.sleep(1000);//issues caution unlike t.join(1000)
/**************************************/
if (((System.currentTimeMillis() - startTime) > patience) &&
t.isAlive()) {
threadMessage("Tired of waiting!");
t.interrupt();
//Shouldn't be long now -- wait indefinitely
t.join();
}

}
threadMessage("Finally!");
}
}

Why does netbeans throw the caution?
Its Because::
There is a difference between join() and sleep(). join() will wait until the timeout expires or the thread finishes. sleep() will just wait for the specified amount of time unless interrupted. So it is perfectly possible for join() to return much faster than the specified time.

The reason why Netbeans warns you about sleep() and not about join() is precisely that difference. join() waits for something meaningful while sleep() just sits there doing nothing. If you aren't waiting for something, then why would you want to wait at all? It is rarely meaningful, hence the warning.

Send Mail through Java

Send a mail in java is easy and deesnt require any fuss.

The JavaMail API is not part of core Java SE, but an optional extension. In addition, it is required in Java Enterprise Edition. The JavaMail packages can be accessed in two ways :
by placing j2ee.jar in the classpath
or, by placing both mail.jar and activation.jar in the classpath
The javax.mail API uses a properties file for reading server names and related configuration. These settings will override any system defaults. Alternatively, the configuration can be set directly in code, using the JavaMail API.

The foillowing code can help u guys::

An email configuration file (to run the example, substitute valid values for the uncommented items) :

# Configuration file for javax.mail
# If a value for an item is not provided, then
# system defaults will be used. These items can
# also be set in code.

# Host whose mail services will be used
# (Default value : localhost)
mail.host=mail.blah.com

# Return address to appear on emails
# (Default value : username@host)
mail.from=webmaster@blah.net

# Other possible items include:
# mail.user=
# mail.store.protocol=
# mail.transport.protocol=
# mail.smtp.host=
# mail.smtp.user=
# mail.debug=

A class which uses this file to send an email :

import java.util.*;
import java.io.*;
import javax.mail.*;
import javax.mail.internet.*;

/**
* Simple demonstration of using the javax.mail API.
*
* Run from the command line. Please edit the implementation
* to use correct email addresses and host name.
*/
public final class Emailer {

public static void main( String... aArguments ){
Emailer emailer = new Emailer();
//the domains of these email addresses should be valid,
//or the example will fail:
emailer.sendEmail(
"fromblah@blah.com", "toblah@blah.com",
"Testing 1-2-3", "blah blah blah"
);
}

/**
* Send a single email.
*/
public void sendEmail(
String aFromEmailAddr, String aToEmailAddr,
String aSubject, String aBody
){
//Here, no Authenticator argument is used (it is null).
//Authenticators are used to prompt the user for user
//name and password.
Session session = Session.getDefaultInstance( fMailServerConfig, null );
MimeMessage message = new MimeMessage( session );
try {
//the "from" address may be set in code, or set in the
//config file under "mail.from" ; here, the latter style is used
//message.setFrom( new InternetAddress(aFromEmailAddr) );
message.addRecipient(
Message.RecipientType.TO, new InternetAddress(aToEmailAddr)
);
message.setSubject( aSubject );
message.setText( aBody );
Transport.send( message );
}
catch (MessagingException ex){
System.err.println("Cannot send email. " + ex);
}
}

/**
* Allows the config to be refreshed at runtime, instead of
* requiring a restart.
*/
public static void refreshConfig() {
fMailServerConfig.clear();
fetchConfig();
}

// PRIVATE //

private static Properties fMailServerConfig = new Properties();

static {
fetchConfig();
}

/**
* Open a specific text file containing mail server
* parameters, and populate a corresponding Properties object.
*/
private static void fetchConfig() {
InputStream input = null;
try {
//If possible, one should try to avoid hard-coding a path in this
//manner; in a web application, one should place such a file in
//WEB-INF, and access it using ServletContext.getResourceAsStream.
//Another alternative is Class.getResourceAsStream.
//This file contains the javax.mail config properties mentioned above.
input = new FileInputStream( "C:\\Temp\\MyMailServer.txt" );
fMailServerConfig.load( input );
}
catch ( IOException ex ){
System.err.println("Cannot open and load mail server properties file.");
}
finally {
try {
if ( input != null ) input.close();
}
catch ( IOException ex ){
System.err.println( "Cannot close mail server properties file." );
}
}
}
}


Select Query of MySql in Java

For any Select query in java write::

public boolean is_login(String username,String pass_word)
{
boolean having=false;

String query="SELECT * FROM userinfo WHERE username='"+username+"'"+"AND password='"+pass_word+"';";
try
{
stmt=conn.createStatement(ResultSet.TYPE_SCROLL_INSENSITIVE,ResultSet.CONCUR_UPDATABLE);
ResultSet rs=stmt.executeQuery(query);
having=rs.next();
rs.close();
stmt.close();
}
catch (Exception e)
{
errmsg ="Cannot connect to database server/*/*/*/*"+e.getMessage();
JOptionPane.showMessageDialog(null,errmsg, "Error msg", JOptionPane.ERROR_MESSAGE);
}
return having;
}

Insert or NonExecutable Query of MySql in java

For queries like insert or delete or Update use these codes in java for MySql::

public boolean insert_ip_loggedin(String ip,int user_id)
{
try {
Statement s3 = conn.createStatement();

s3.execute("insert into logged_in(user_id,logged_ip,logged_now) values('"+user_id+"','"+ip+"','yes')");
s3.close ();
return true;
}
catch(Exception e){
String err = "Cannot connect to database server: "+e.getMessage();
JOptionPane.showMessageDialog(null,"Please click logout before exiting", "Information", JOptionPane.INFORMATION_MESSAGE);
return false;
}

}

Connect to MySql with Java

First install the Mysql/Java connector in ur pc or add the dll files needed found here
MySql/J connector

final static String userName = "root";
final static String password = "";
final static String url = "jdbc:mysql://192.168.60.93/java";// String url = "jdbc:mySubprotocol:myDataSource"; ?
Statement stmt;
Connection conn=null;


for creating connection use the following codes which is easy:

public void Create_conn()
{
try
{

Class.forName ("com.mysql.jdbc.Driver").newInstance ();
conn = DriverManager.getConnection (url, userName, password);
System.out.println ("Database connection established");

}
catch (Exception e)
{
errmsg ="Cannot connect to database server"+e.getMessage();
JOptionPane.showMessageDialog(null,errmsg, "Error msg", JOptionPane.ERROR_MESSAGE);
}

}

Send Attachments/files in Mail Java

The JavaMail FAQ can be found at the official java site here:
http://java.sun.com/products/javamail/FAQ.html
Q: How do I send a message with an attachment?
A: A message with attachments is represented as a MIME multipart message where the first part is the main body of the message and the other parts are the attachments. There are numerous examples showing how to construct such a message in the demo programs included in the JavaMail download package. To attach a file use the attachFile method of MimeBodyPart.

Q: How do I read a message with an attachment and save the attachment?
A: As described above, a message with an attachment is represented in MIME as a multipart message. In the simple case, the results of the Message object's getContent method will be a MimeMultipart object. The first body part of the multipart object wil be the main text of the message. The other body parts will be attachments. The msgshow.java demo program shows how to traverse all the multipart objects in a message and extract the data of each of the body parts. The getDisposition method will give you a hint as to whether the body part should be displayed inline or should be considered an attachment (but note that not all mailers provide this information). So to save the contents of a body part in a file, use the saveFile method of MimeBodyPart.


MimeMultipart messageContent = new MimeMultipart();

BodyPart bodyPart = new MimeBodyPart();
DataSource source = new FileDataSource(yourFile);
bodyPart.setDataHandler(new DataHandler(source);
bodyPart.setFileName("MyFile.ext");
bodyPart.setDisposition(Part.ATTACHMENT);

// Then add to your message:
messageContent.addBodyPart(bodyPart);

Java UDP Network Codes


Sending/Receiving Datagram Packets via UDP
The following are related to sending and receiving datagram packets via UDP.
1.DatagramPacket
2.DatagramSocket

DatagramPacket represents a datagram packet. Datagram packets are used for connectionless delivery and
normally include destination address and port information. DatagramSocket is a socket used for sending
and receiving datagram packets over a network via UDP. A DatagramPacket is sent from a DatagramSocketby
calling the send(...) method of DatagramSocket with DatagramPacket as the argument:
send(DatagramPacket dp). receive(DatagramPacket dp) is use for receiving aDatagramPacket.
(The MulticastSocket class may be used for sending/receiving aDatagramPacket to a mulitcast group. It is
a subclass of DatagramSocket that adds functionality for multicasting.)

UDP SERVER PROGRAM

import java.io.*;
import java.net.*;

class UDPServer
{
public static void main(String args[]) throws Exception
{
DatagramSocket serverSocket = new DatagramSocket(9876);
byte[] receiveData = new byte[1024];
byte[] sendData = new byte[1024];
while(true)
{
DatagramPacket receivePacket = new DatagramPacket(receiveData, receiveData.length);
serverSocket.receive(receivePacket);
String sentence = new String( receivePacket.getData());
System.out.println("RECEIVED: " + sentence);
InetAddress IPAddress = receivePacket.getAddress();
int port = receivePacket.getPort();
String capitalizedSentence = sentence.toUpperCase();
sendData = capitalizedSentence.getBytes();
DatagramPacket sendPacket =
new DatagramPacket(sendData, sendData.length, IPAddress, port);
serverSocket.send(sendPacket);
}
}
}

UDP CLIENT PROGRAM


import java.io.*;
import java.net.*;

class UDPClient
{
public static void main(String args[]) throws Exception
{
BufferedReader inFromUser =
new BufferedReader(new InputStreamReader(System.in));
DatagramSocket clientSocket = new DatagramSocket();
InetAddress IPAddress = InetAddress.getByName("localhost");
byte[] sendData = new byte[1024];
byte[] receiveData = new byte[1024];
String sentence = inFromUser.readLine();
sendData = sentence.getBytes();
DatagramPacket sendPacket = new DatagramPacket(sendData, sendData.length, IPAddress, 9876);
clientSocket.send(sendPacket);
DatagramPacket receivePacket = new DatagramPacket(receiveData, receiveData.length);
clientSocket.receive(receivePacket);
String modifiedSentence = new String(receivePacket.getData());
System.out.println("FROM SERVER:" + modifiedSentence);
clientSocket.close();
}
}

TCP Server side Code Java Part 1


Client Side Program

import java.lang.*;
import java.io.*;
import java.net.*;
import java.net.InetAddress;

class client
{
Public static void main(String args[])
{
Socket sock=null;
DataInputStream dis=null;
PrintStream ps=null;
System.out.println(" Trying to connect");
try
{
// to get the ip address of the server by the name

InetAddress ip =InetAddress.getByName
("Hari.calsoftlabs.com");

// Connecting to the port 1025 declared
in the Serverclass
// Creates a socket with the server
bind to it.

sock= new Socket(ip,Server.PORT);
ps= new PrintStream(sock.getOutputStream());
ps.println(" Hi from client");
DataInputStream is = new
DataInputStream(sock.getInputStream());
System.out.println(is.readLine());

}
0catch(SocketException e)
{
System.out.println("SocketException " + e);
}
catch(IOException e)
{
System.out.println("IOException " + e);
}

// Finally closing the socket from
the client side

finally
{
try
{
sock.close();
}
catch(IOException ie)
{
System.out.println(" Close Error :" +
ie.getMessage());
}
}

}
}

TCP Server side Code Java Part 1

MAKING TCP CONNECTION
These classes are related to making normal TCP connections:
1.ServerSocket
2.Socket

ServerSocket represents the socket on a server that waits and listens for requests for service from a
client.Socket represents the endpoints for communication between a server and a client. When a server
gets a request for service, it creates a Socket for communication with the client and continues to listen
for other requests on the ServerSocket. The client also creates a Socket for communication with the
server.


Simple Server Client Messaging Using TCP

Server Side Program
// Import Java Packages
import java.net.*;
import java.lang.*;
import java.io.*;

public class Server{
//port number should be more than 1024
public static final int PORT = 1025;
public static void main( String args[])
{
ServerSocket sersock = null;
Socket sock = null;
System.out.println(" Wait !! ");

try
{
// Initialising the ServerSocket
sersock = new ServerSocket(PORT);
// Gives the Server Details Machine name,Port number
System.out.println("Server Started :"+sersock);

try
{
/* makes a socket connection to particular client after
which two way communication take place */
sock = sersock.accept();
System.out.println("Client Connected :"+ sock);
// Receive message from client i.e Request from client

DataInputStream ins = new DataInputStream(sock.getInputStream());
// Send message to the client i.e Response
PrintStream ios = new PrintStream(sock.getOutputStream());
ios.println("Hello from server");
ios.close();
// Close the Socket connection
sock.close();
}
catch(SocketException se)
{
System.out.println("Server Socket
problem "+se.getMessage());
}
catch(Exception e)
{
System.out.println("Couldn't start "
+ e.getMessage()) ;
}

// Usage of some methods in Socket class

System.out.println(" Connection from : " +
sock.getInetAddress());
}
}